How to Record in FL Studio Without an Audio Interface
To record in FL Studio without an audio interface, open Audio Settings (F10). On Windows, choose FL Studio ASIO, set its Input to your USB or built-in mic, and set its Output to your headphones. On a Mac, pick the mic as Input and your headphones as Output. Then route that input to a Mixer track and hit record. One catch: you need Producer Edition or higher, because Image-Line's edition comparison lists audio recording as "Producer Edition and up."
Plenty of beats start life as a vocal idea mumbled into a laptop mic. This page gets that working, then shows you where the no-interface route runs out.
What you need
A USB mic, a USB headset, or your computer's built-in mic will do. Each one has its own preamp and converter, so FL Studio sees it as an audio device. Image-Line's USB mic guide even says there's "no technical reason for a USB microphone to be inferior" to an analog one.
| Mic | Good for | How FL Studio sees it |
|---|---|---|
| Built-in laptop mic | Scratch vocals, song ideas | "Built-in Microphone," the Mac default input |
| USB headset | Spoken word, demo vocals | One input and one output device |
| USB mic with headphone jack | Finished vocals, podcasts | An input, and an output for its headphone jack |
FL Studio edition
Producer+
Fruity Edition can't record audio.
Headphones
Closed-back
Speakers bleed the beat into your vocal.
Windows driver
FL Studio ASIO
Installed with FL Studio.
Shopping for a USB mic? See are USB mics good for recording vocals.
Windows: set up FL Studio ASIO
On Windows, use FL Studio ASIO. It lets you pick one input device and a different output device, which is exactly what a USB mic setup needs. Image-Line's audio settings manual describes it as a layer on top of Windows audio that's "fully multi-client" on most machines, so other apps can still play at the same time.
- Open Audio Settings. Press F10, or choose Options, Audio settings.
- Pick the driver. In the Device menu, choose FL Studio ASIO.
- Set Input and Output. Set Input to your USB mic (or the built-in mic) and Output to the jack your headphones use. If a device is missing, set it as the Windows default input or output first, as Image-Line's USB mic guide advises.
- Set the buffer. Click Show ASIO panel and aim for 10 ms (441 samples), the target the manual recommends. Raise it only if you hear clicks or crackles.
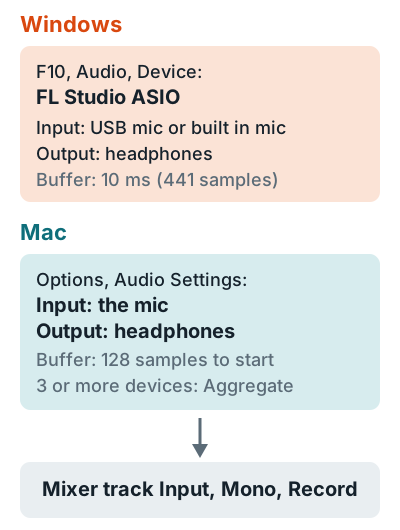
Image-Line warns that FL Studio ASIO can be prone to audio jitter. If your takes start drifting off the grid, try ASIO4ALL next.
Using ASIO4ALL instead
Use ASIO4ALL when you want to record more than one USB device at once, or when FL Studio ASIO glitches. It's a free third-party driver that comes with the default FL Studio installer. Image-Line ranks it above FL Studio ASIO, though below a device's own ASIO driver.
- Choose ASIO4ALL v2 in the F10 Audio Settings Device menu.
- Click Show ASIO panel. If it opens in simple mode, click the wrench icon at the lower right for Advanced mode.
- Enable the devices. In the WDM Device List, switch on your USB mic and your output device, then click [+] next to each and enable the inputs and outputs you need. Enabled items show a lit blue button.
- Check the Mixer. The mic should now appear in a Mixer track's Input menu.
Mac: choose the mic in Audio Settings
Mac users get off easy. FL Studio uses Core Audio, so you pick one input and one output device directly. The manual lists "Built-in Microphone" and "Built-in Output" as the defaults, so the built-in mic works with no extra setup.
- Allow mic access. FL Studio needs microphone permission on macOS 10.14 and later. In current macOS, open System Settings, Privacy and Security, Microphone and switch FL Studio on.
- Open Options, Audio Settings. Set Input to your USB mic and Output to your headphones or Mac speakers.
- Set the buffer. On Apple silicon, Image-Line says "128 is the recommended starting point," then step up to 192, 256, or 512 if audio crackles.
- Aggregate only if needed. To use more than one input and one output device, create an Aggregate Device in Audio MIDI Setup (click +, then Create Aggregate Device, and check Use for each device), then select it in FL Studio's Device list.
Apple's Audio MIDI Setup guide says every device in an aggregate should use the same sample rate. Image-Line adds that an aggregate takes on the highest latency of its devices, so only build one if you need it.
Record your first take
Once the mic shows up as a Mixer input, recording works the same as it would with an interface. These steps follow Image-Line's recording audio manual.
- Turn on audio recording. Right-click the Record button and make sure Audio is checked.
- Pick an empty Mixer track, not the Master.
- Select the input. Open the track's Input menu and choose your mic from the lower Mono list. Selecting an input also arms the track.
- Set the pickup to EXT. The manual marks External input only (EXT) as recommended, so the take is recorded dry and you can add effects later.
- Record. Left-click Record to arm it, press Play, perform, then press Stop. The take lands in Documents, FL Studio, Audio, Recorded.
To keep takes locked to the beat, open the Mixer menu, go to Disk Recording, and turn on Latency compensation. The full vocal workflow, Edison included, is on how to record vocals in FL Studio, and guitar is on how to record guitar in FL Studio.
Hear yourself without a delay
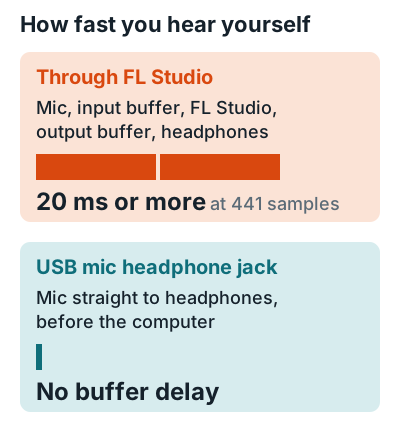
Without an interface, your voice comes back to you only after it passes through FL Studio's input and output buffers. Image-Line says that creates a distracting echo, most noticeable for vocalists. A USB mic with its own headphone jack fixes it, because the mic sends your voice to your headphones before the computer gets involved.
If you've ever tried to stay on beat while your own voice slaps back late in your headphones, you know why this matters.
USB mic jack
Shure says the MV7+ 3.5 mm output gives latency-free monitoring.
Mute the echo
Image-Line suggests disabling the mic track's send to the Master, so you hear only the direct sound.
Smaller buffer
Lower the buffer until clicks start, then go one step back up.
If the echo is still there, see how to turn off monitoring in FL Studio.
When an audio interface is worth it
Buy an interface when you need an XLR mic, a guitar input, two sources at once, or zero-latency monitoring with any mic. Even Image-Line recommends an analog mic and an external interface for new purchases, citing wider compatibility, longer cable runs, direct monitoring, and better preamps. If you're sketching ideas over loops, though, a USB mic gets you a long way.
That decision is laid out in do you need an audio interface, what the box does in what an audio interface is, and the current picks in the best audio interface for home recording.
FAQ
Can I record without an audio interface?
Yes. A USB mic or your computer's built-in mic works in FL Studio, as long as you select it as the input in Audio Settings and you have Producer Edition or higher.
Why can't I hear FL Studio when I select my USB mic?
Most drivers use one device at a time, so picking the mic as the device moves playback to the mic too. On Windows, choose FL Studio ASIO with the mic as Input and your headphones as Output. On a Mac, set Input and Output separately.
Can FL Studio Fruity Edition record a microphone?
No. Image-Line lists audio recording as Producer Edition and up, so Fruity Edition can't record a mic with or without an interface.
What buffer size should I use for recording in FL Studio?
Image-Line suggests 10 ms (441 samples) on Windows with FL Studio ASIO, and 128 samples as the starting point on Apple silicon Macs. Raise it only if you hear clicks.
Should I use ASIO4ALL or FL Studio ASIO?
FL Studio ASIO for one USB mic, and ASIO4ALL when you need several inputs at once. Image-Line ranks a device's own ASIO driver first, then ASIO4ALL, then FL Studio ASIO.
More answers: Home recording FAQ