How to Build a Home Recording Studio
To build a home recording studio, work in this order: choose the quietest room, set up a computer and DAW, add an audio interface, a mic, and closed-back headphones, wire them together, place your desk and monitors, then treat the room. A first home studio setup of interface, XLR mic, and headphones costs about $450 at list prices, and you can record with it before you own a single monitor or panel.
The build order
Build in the order that gets you recording soonest. Each step works without the ones after it, so you can start tracking after step 4 and fill in the rest as you go.
- Choose the room. Quiet and dry beats big. Room
- Set up the computer and DAW. 8 GB of RAM is the floor. Computer
- Buy the interface, mic, and headphones. That alone is a working rig. Gear
- Wire it together. XLR in, USB-C to the computer, headphones out. Wiring
- Place the desk and monitors. Equilateral triangle, tweeters at ear height. Monitors
- Treat the room. Corners first, then reflection points. Treatment
1. Choose the room
Use the quietest, least echoey room you have, whether that's a spare bedroom, an office, or a music studio in the basement. Neumann's home vocal recording guide says to choose a room with as little noise and reverb as possible. It also says bathrooms are usually too ambient, so the tiled room with the flattering shower reverb is out.
Auralex says a rectangular room is the most predictable, and that a door or opening on only one side breaks the room's symmetry. So pick the wall your desk will face with the goal of keeping the left and right sides matched. Small-room layouts are in bedroom studio setup and home studio design and layout.
2. Set up the computer and DAW
Start with the computer you already own. Ableton's Live 12 minimum requirements are 8 GB of RAM with a 5th-generation Intel Core i5, an AVX2-capable AMD Ryzen, or Apple silicon. Ableton's computer guide recommends 16 GB for typical music production and an SSD for the system drive. If your laptop clears the minimum, record on it and spend the money elsewhere.
Interface bundle
3 DAWs
Scarlett interfaces include Ableton Live Lite, Pro Tools Intro+, and Cubase LE.
On a Mac, grab GarageBand from the App Store. It can create and mix up to 255 audio tracks. Comparisons are in the best DAW for beginners, and if you do need a new machine, see the best computer for home recording.
3. Buy the interface, mic and headphones
One interface with phantom power, one cardioid mic, and one pair of closed-back headphones is a complete recording setup. Don't let anyone talk you into more on day one.
| Item | Example | Key spec | List price |
|---|---|---|---|
| 1-input interface | Focusrite Scarlett Solo | 1 mic preamp, 1 instrument input, 57 dB gain | $169.99 |
| 2-input interface | Focusrite Scarlett 2i2 | 2 mic preamps, 2 balanced line outs | $239.99 |
| Condenser mic | Audio-Technica AT2020 | Cardioid, needs 48V phantom | $119 |
| Headphones | Audio-Technica ATH-M50x | Closed-back | $159 |
Get the 2i2 if you'll ever record two mics at once, like a singer and an acoustic guitar. Neumann specifies closed-back headphones for recording because open-back models leak the track into the mic, and that bleed ends up under your vocal. More picks are in the audio interface guide, the best home studio microphones, and the home recording equipment list.
4. Wire it together
The mic goes into the interface with an XLR cable, the interface connects to the computer by USB, headphones plug into the headphone jack, and monitors connect to the balanced line outputs. The interface is the hub for all of it.
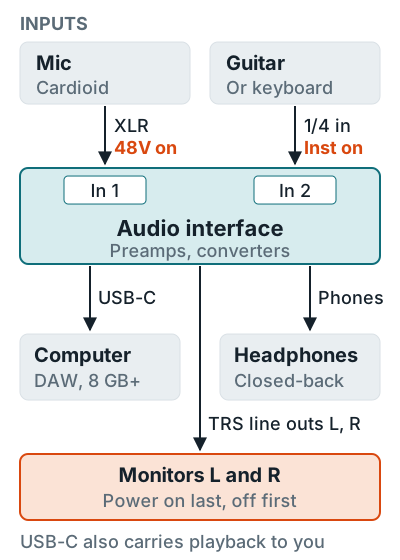
- Install the interface software, such as Focusrite Control 2 for a Scarlett 2i2, then connect the USB-C cable. The 2i2 runs on bus power from the computer.
- Plug the mic into input 1 with an XLR cable and switch on 48V (phantom power) if it's a condenser like the AT2020.
- Plug a guitar into the instrument input with a 1/4-inch cable and switch that input to Inst. Details are in connecting a guitar to an audio interface.
- Connect the monitors to the left and right line outputs with balanced TRS cables. Turn the monitors on last and off first, per the Yamaha HS manual.
- Select the interface as the input and output device in your DAW and record at 24-bit, which Neumann says gives plenty of resolution.
No sound? Start with how to connect an audio interface to a computer and how to connect studio monitors to a computer. For when to use 48V, see what phantom power does.
5. Place the desk and monitors
Face the desk down the room's length, centered between the side walls, with your head about 38 percent of the room length from the front wall. Auralex's home studio guide uses that 38 percent point, which is about 5.7 feet in a 15-foot room.
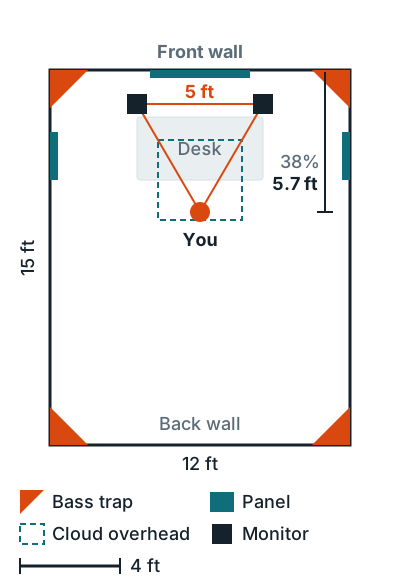
Step-by-step placement is in how to set up studio monitors, the seat math is on the 38% rule, and picks are in the best studio monitors for home studios.
6. Treat the room
Treat in this order: bass traps in the corners, panels at the first reflection points, a panel behind the monitors, then a cloud above your seat. Auralex says "the first step for acoustic treatment in any small room should be to place bass traps in all of the corners," and recommends treating the ceiling directly above the listening position.
1. Corners
Bass traps, ear height (30 to 36 in) first if the budget is short.
2. Side walls
Panels where a mirror shows a monitor from your seat.
3. Front wall
A panel behind the monitors for rear-wall slap.
4. Ceiling
A cloud directly above the listening position.
To find the side wall spots, sit at the desk while a helper slides a mirror along the wall. GIK Acoustics' reflection point guide says wherever you can see the loudspeaker in the mirror is a first reflection point. What treatment won't do is keep sound in or out of the room. That's soundproofing, covered in how to soundproof a home studio.
Panel counts and products are in the acoustic treatment guide, bass traps, where to place acoustic panels, and how many acoustic panels you need.
How to build a home studio for beginners
For beginners, build only steps 1 to 4 first: a quiet room, the computer you have, a free DAW, and either a USB mic or an interface and XLR mic, plus closed-back headphones. Monitors and treatment can wait until you start mixing. Get a few songs recorded before you spend another dollar.
USB route
About $330
AT2020USB-X ($169), which records at up to 24-bit/96 kHz and has its own headphone jack, plus ATH-M50x headphones.
XLR route
About $450
Scarlett Solo, AT2020, and ATH-M50x. Adds a guitar input and lets you swap the mic later.
The tradeoffs between the two routes are on XLR vs USB microphone. Line-item prices are on home recording studio cost, a full shopping list is on what you need to record music at home, and cheaper paths are in building a home studio on a budget. The overview of every part is in the home recording studio guide.
FAQ
How much does it cost to build a home recording studio?
About $450 at list prices for a Scarlett Solo, an AT2020, and ATH-M50x headphones. Add monitors and panels later and most builds land at $1,000 to $1,500.
Can I build a recording studio in a basement or bedroom?
Yes, if it's the quietest room you have and isn't too echoey. Neumann's test is a room with as little noise and reverb as possible, and its guide rules out bathrooms as usually too ambient.
Do I need studio monitors to start recording?
No. Closed-back headphones are enough to record, and they're what you track with anyway. Add monitors when you start mixing.
How much RAM does a home studio computer need?
Ableton lists 8 GB as the minimum for Live 12 and recommends 16 GB for typical music production, or 32 GB for large sample libraries.
Does acoustic treatment soundproof a room?
No. Panels and bass traps absorb reflections inside the room. Stopping sound from getting through the walls is a separate soundproofing job.
More answers: Home recording FAQ